Install Git on Windows
This guide will walk you through the process of installing Git on Windows. Git is essential for running Recyclarr, as it's used to download and update the application.
Quick Start
For those familiar with package managers, you can quickly install Git using one of the following methods:
-
Using Winget CLI:
winget install --id Git.Git -e --source winget -
Using Chocolatey:
choco install git
If you prefer a more guided approach or don't use package managers, continue reading for detailed instructions using the official Git installer.
Detailed Installation Guide
Using the Git for Windows Installer
Skip this section if you've already installed Git using Winget or Chocolatey.
-
Download the official Git for Windows installer.
-
Before running the installer, close any open terminal windows (PowerShell, CMD, etc.). This is important because the installer will modify your
PATHenvironment variable, and open terminals won't reflect these changes. -
Run the downloaded installer.
-
During the installation wizard, you can keep all options at their default settings for a standard installation.
-
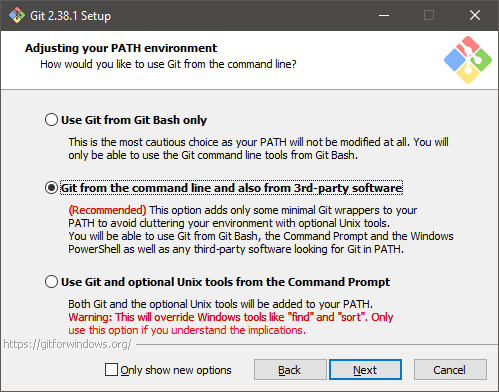
Pay special attention to the following page in the wizard:

Ensure that the option "Git from the command line and also from 3rd-party software" is selected. This should be the default choice.
-
Complete the installation process.
Verifying the Installation
After installation, you can verify that Git is correctly installed by opening a new terminal window and running:
git --version
If Git is properly installed, this command will display the installed version of Git.
Next Steps
With Git successfully installed, you're now ready to use Recyclarr. If you haven't already, check out our Getting Started guide to begin using Recyclarr.
Remember to always use a new terminal window after installing Git to ensure that your system recognizes the new installation.